DIY photo & text throw pillow
You've probably seen enough of typographical throw pillows before; they're pretty trendy and at that place'due south lots of tutorials out at that place showing you how to stencil words onto a pillow comprehend. But today'south project is unlike: instead of but painting or stenciling a discussion on a pillow embrace, you can put one of your favorite photos inside a piece of text, then print the design onto atomic number 26-on transfer paper and transfer it to a pillow encompass (or tee shirt, or quilt block!)

So basically you first with an awesome photo, and cease up with an crawly photograph/text throw pillow.
Click hither for 40 more photo craft ideas!

It'southward another mode to personalize the decor in your habitation and showcase 1 of your favorite photos in a unique manner.

Using iron-on transfer paper gives a pretty professional looking consequence. You lot tin can even see the texture of the textile right through the letters:

Snazzy!

I transferred the photograph text to cloth and so sewed up my own pom pom pillow cover using the method institute here, just y'all could skip the sewing and apply a premade pillow cover instead.

Today's tutorial has two parts: first I'll show you lot how to create your ain text with a photo inside using Adobe Photoshop Elements, then I'll show you how to use iron on paper to transfer the blueprint to a pillow embrace (or any other fabric!) And if you don't want to employ one of your own photos for this project, yous can download the design I created as a PDF further down in the postal service.
If you lot like doing projects with your photos, it'southward totally worth investing in Photoshop Elements – I use it all the fourth dimension. Thank you lot to Adobe for sponsoring this mail. See my other projects using Photoshop Elements hither.
How to Put a Photograph Inside Text using Photoshop Elements
UPDATE: So Adobe has merely released Photoshop Elements 15 which has a new Guided Edit which makes this process even easier! I'll give you a quick rundown of how to do it in Photoshop Elements 15 right here. Scroll down if you're using an earlier version for the original instructions.
Begin by opening a photo in Photoshop Elements 15 and clicking on Guided Edits style at the elevation. Under that, you'll click on Fun Edits. Down in the very lesser, yous'll see all the photos you have open. Click the one you want to employ, then click on the Photo Text Guided Edit.

This volition bring you to a new, bare window. Click the Type Tool in the right sidebar, and begin typing your text. You'll see down at the bottom that you tin can change the font, size, leading, etc. Play effectually with it until you similar the look of your text.

At this point, y'all can click on the Fit or Fill buttons in the correct sidebar, which will make your text big enough to fill up your unabridged photo.

Once y'all like how your text looks, you lot can click "Skilful" at the pinnacle to continue editing in expert way.
Instructions if you Exercise Not take Photoshop Elements 15 nonetheless:
Notation: I always work in floating documents way in Photoshop Elements, which allows me to accept more than than one document visible on the screen at one time. If you'd like to plow this option on, become to Preferences and bank check "Let Floating Documents in Expert Manner."
First past opening a new certificate in the adept way of Photoshop Elements (File–>New–>Blank File). I wanted my messages to exist as big as possible, but considering we'll be press them on fe-on newspaper, the tallest my blueprint tin can be is 11 inches, and then I made my certificate xi×eleven inches at 300 Pixels/Inch. I chose the text tool and typed the word LOVE, using all caps and splitting it into two different lines of text.

I changed the font to something nice and thick (Superclarendon Black) and adjusted the font size and leading until the word mostly filled upward the certificate. Leading controls the space between the 2 lines of text.

At this signal, I opened a pretty dusk photo.

Drag the photo onto the text certificate.
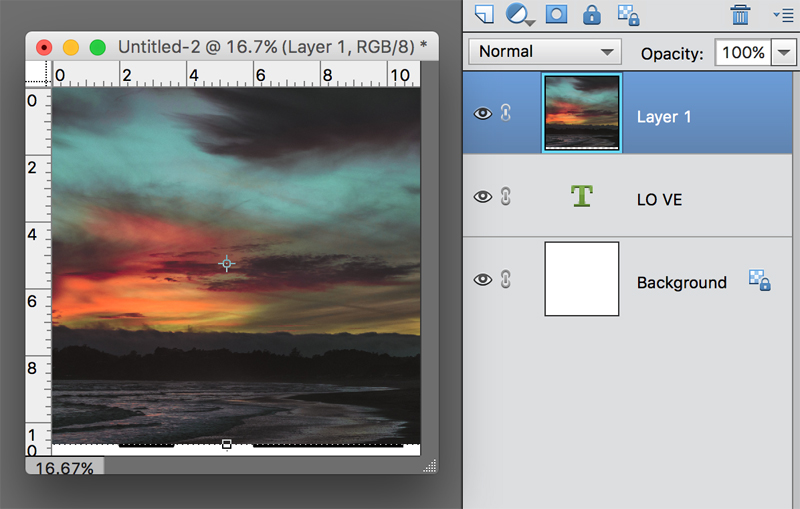
At present you'll encounter three layers in the layers palette on the correct: the groundwork, the examination, and the photograph. Hover your mouse on the line betwixt the text and photo. Agree downwards the alt (or option) key, and click on the line. That will "clip" the photo into the text. That means only the portions of the photo that overlap the text will exist visible.

What's cool is that yous can still modify the size of the photo, or grab it and move it effectually, then different portions of it are visible in the letters. Play with the placement of the photo until you like how the messages look.
For all versions of Photoshop Elements continue here:
In order to employ fe-on transfer paper, nosotros need a mirror prototype of the design, so go to Prototype–>Rotate–>Flip Horizontal.
Since I made the design bigger than an 8.5×11 slice of paper, nosotros need to split it onto 2 pages to print. Open up two new documents that are each 8.five×xi inches. Choose the rectangular marquee tool and draw a rectangle around the left half of the design, making sure your rectangle doesn't overlap whatsoever of the letters.

Hold down the command central and drag those 2 letters onto the first new document. Repeat with the other letters and drag them onto the second new certificate. These are the documents you'll want to print onto the iron-on paper.

NOTE: if you make your pattern smaller than 8.5×xi originally you'll be able to impress the entire thing on one sail of atomic number 26 on paper. If you wanted your design fifty-fifty bigger, you could divide it up into 4 documents and print onto 4 sheets of atomic number 26 on paper.
If you'd like to use this design, you can download these 2 pages for free past clicking here. Print them at 100% or total size for a xvi or 18 inch pillow embrace (mine is 16 inches).
How to Transfer a Printed Pattern onto a Pillow Cover
Ok, on to the photo transfer part! This is piece of cake. I used Silhouette make heat transfer material found here on Amazon. Print out the design on the bare side of the newspaper (not the grid side).
Optional: Cut out each alphabetic character. The transfer newspaper is clear, and then y'all actually don't need to cut out each letter, but I think information technology gives a more than professional result if you lot do. I did not cut the within of the "O" out notwithstanding – that's totally non necessary.
Place the letters face down on your pillow cover (so they no longer look reversed), and make sure they are spaced evenly. Place a hot atomic number 26 down on ane of the messages and go out it there for about 30 seconds. Selection upwardly the iron and movement it as needed to atomic number 26 on the rest of the letter. Continue picking up the atomic number 26 and placing it downwardly until all parts of the design accept been heated for about xxx seconds. Let the blueprint cool, and and then it should be very easy to peel the back from each letter, leaving the pattern downwardly on the textile. If the backing doesn't come off easily, iron information technology over again. Note: one time you lot have removed the backing, exercise non iron over the letters! They will stick to your iron. If you need to iron your completed pillow cover, employ a warm – not hot – atomic number 26, and apply a press cloth. The cover can be washed – just plow it within out for all-time results.
Here's a quick video showing the steps:
Remember, I transferred the letters onto fabric and made my own pillow comprehend using this tutorial, but you tin can use a premade embrace if y'all similar.
Notation: if you utilize a different brand of iron-on paper, follow the directions for that brand.

Put a pillow form in your pillow cover, and your new photo & text throw pillow is set to liven upward your living room.
Be sure to take a wait at Adobe Photoshop Elements if you don't already own it – I employ it near every day for editing photos and creating fun photo projects. Encounter how easy information technology is to create coloring pages from a photo here, and learn how to make photo gift carte holders here.
And if you want a click await at more you lot can do with the new version – Photoshop Elements xv – check out this post!
Source: https://www.itsalwaysautumn.com/diy-typography-throw-pillow.html
0 Response to "DIY photo & text throw pillow"
Post a Comment